Tuesday, January 12, 2016

Beginners Guide: How to connect engine and gear

One of the most asked question is: How to connect engine and gear?
So, there are several ways to solve this problem.

Requirement for all ways (with fixed shaft)
It is recommended that the engine shaft fits perfectly into the gear. I used an engine with an 3,7 mm shaft. This helps to align the gear.
If your shaft is thicker: Make it thinner ;)
If your shaft is thinner: Than it is new for me.
But I have there an idea. Drill a hole into an axle and glue your shaft into the axle. When someone has tried it, please tell us about your experience.

Glue it!
At the beginning, I only glued it with some hot glue. With this construction I created my first video of the 42000 model. But it can't transmit high torques and have problems with heat.

Slit and glue it!
First cut a slit of 5 mm or more into your shaft. Now take some metal which will fit into your slit and cut an rectangle which will fit into your slit, and a gear over both. Glue it now with hot glue.


Mount an axle!
Some engines have no fixed shaft like the Multistar BabyBeast. The shaft is only fixed with 4 screws.

 
This gives us the possibility to print our own shaft, which will fit to any LEGO gear. I have constructed this for an unreleased project. After an successful test, I will publish this .STL file too.


Sunday, January 10, 2016

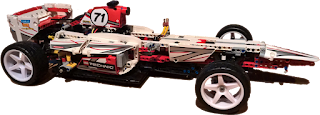
Files: 42000 Grand Prix Racer

Here you can find all files which where needed to build your own LEGO 42000 High Speed Model. Additional you will need a separate steering part which you can find here.


Download: HSLego4200Files

Files: 42039 24H Race Car files

Here you can find all files which where needed to build your own LEGO 42039 High Speed Model. Additional you will need a separate steering part which you can find here.


Download: HSLego42039Files

Files: Steering

Here you can get an universal adapter for your steering servo. I used this in several models. Additional you need a needle!


Download: HSLegoSteeringFiles

Beginners Guide: How much it costs and what I need

After you know how to start, the next questions on the way to your own High Speed LEGO model are the budget, tools, parts and where you can get them.

Budget
When your model is based on a original Lego Modell like the 42000 or 42039, and you will start from zero, you will need round about 250€ including the original LEGO model.

Tools
The following list contains all tools which you need to build your own model.
  • 3D-Printer
  • Screwdriver
  • Grease
  • Cable ties
  • Duct tape


Parts
The following list is a general checklist and no concrete list for a model. When you want to see a detailed list, please refer to the descriptions of my YouTube videos.
  • LEGO Model
  • Engine (Brushless outrunner)
  • ESC for Engine
  • 3CH 2.4GHz Transmitter and Receiver 
  • Battery Pack
  • Steering servo
  • Gyro-System for RC Cars (Optional)
  • Lego parts for steering and gearbox
  • Engine mount (3D-Print)
  • Steering connection (3D-Print)
  • Needle (Steering)

Shops
I have listed several shops where I bought my stuff. The first is my local RC shop (RC-Mod-Shop). When I have no idea what I need, I will go there. Look if you can find one in your near, it can be extrem helpfully.

Beginners Guide: How to start

To get an idea how to build your own High Speed LEGO model, I will show you my creation process. Because this is a beginners guide, I will not tell every detail. Therefore I will post separate articles.

Base model
The creation process of my models started with building the base model. After that I removed parts until I had enough space for my RC-parts and a gearbox. In case of the LEGO model 42000 and 42039 I have removed the LEGO Engine. Additional you need some space for the steering servo.

Gearbox
The next step is to design a gearbox. You can do it with real LEGO parts, the LEGO Digital Designer or other LEGO design software. I used the LEGO Digital Designer for all of my projects. When you don't know which ratio you will need for your Model now, you can design it first with 2 or 3 pairs of a 8 tooth and 24 tooth gear. Later you can change it with a pair of 12 tooth and 20 tooth. So you can adjust your gear ratio.


Engine mount
I created my engine mounts with Autodesk 3ds Max, but you can use any other 3D modelling software. My recommended export file format is .stl. For all who can't design their own engine mounts, I will publish my for free use.


Order Parts
Now it is time to order all needed parts. A list with all RC-components can be found in the "Beginners Guide: How much it costs and what I need" article. Additional you will find there a list with shops where I ordered my parts.

Build drive
After receiving all parts, it is time to build our drive into the model. Use a lot of grease to reduce the wear on LEGO parts.

Steering
First you have to find a good place for your steering servo and find an idea how to fix him. To connect the servo with the LEGO axle, I recommend my little steering adapter, which I will publish with the steering article. I used it in all my models.

Test and improve
After mounting your model, it is time for the first test. In my first test I had a lot of problems with gears and axles. To fix this problems, it will help to reinforce your model. It is recommended that each side of both axles will be hold by the same part. After some iterations of test and improve your model, you will have an awesome High Speed LEGO model :)


Thursday, November 12, 2015

Welcome to High Speed Lego

Welcome to my brand new blog: High Speed Lego.

In this blog, I will describe how to build realy fast Lego RC cars.
That means top speeds over 50km/h

At the moment I have two RC Cars, based on the 42000 F1 Car an the 42039 24h Race Car.
Both are available to see on YouTube: https://www.youtube.com/playlist?list=PLb0PnkkzE7iciaEPK3WycYJ7-y02yYXrP

After some comments, about how to built a lego car like this, I decided to start this blog. So I will instructions, tips, models  and part lists write, for all who are interested in building their own high speed Lego RC car.

Best regards,
Sheepy